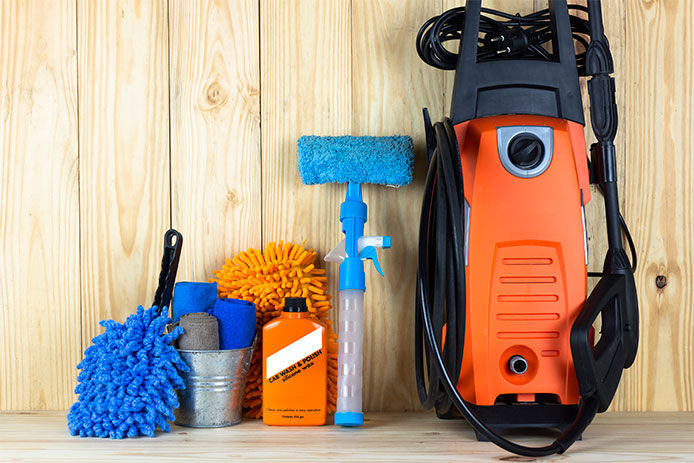
Skip to Main Content
Back to Navigation

How to Detail Your Car

a young woman cleaning and detailing her car

Have you ever wanted to restore your car to its former glory? Washing isn't enough; in fact, it barely wipes the surface of cleaning your vehicle. To get a thorough deep cleaning inside and out, from top to bottom, you'll want to detail it. You'll want to detail your car about twice a year, so you could take it to a professional or do it yourself! Here are ways to clean every crevice of the interior and exterior of your car.

Make Your Car Shine — Exterior Detailing

The exterior of a blue sedan

1. Prewash

Start by grabbing a bucket or pressure washer and give your baby a prewash. Prewashing minimizes swirl marks and scratches.

2. Focus on the Tires

Don't grab the sponge just yet; instead, focus on the wheels. The tires are undoubtedly the dirtiest part of the car, so take time cleaning them. First, spray on some tire cleaner, let it sit, then rinse it off. Then scrub your tires in a circular motion; this will remove the dirt and debris. Make sure to get all the nooks and crannies by using a sponge.

3. Use the Two-bucket Method

Finish washing the car using the two-bucket method. Fill one bucket with warm, soapy water and one with regular, cold water. You'll use the non-soapy bucket to rinse your sponge. Invest in a high-quality sponge to prevent scratching.

With your sponge or mitt, wring out the soapy water onto the car. This acts as a pre-soak. Start washing the car in sections. Once a section is done, rinse it with a hose before moving onto the next section. It is important to keep the car wet throughout the entire process. If you prefer to use a pressure washer, attach the soap nozzle, and spray your entire vehicle. Use a sponge to wipe off any stuck-on dirt or flies. Switch to a low-pressure nozzle and rinse off all the soap and water.

Man drying a car with a red microfiber towel

4. Dry with Microfiber

Once you've washed the car, it is time to start drying. Use a microfiber towel to prevent watermarks and make your car look shiny and new.

5. Use a Clay Bar

Next, use a clay bar whose one and only job is to remove bonded contamination on the surface of the paint (or glass). When properly applied, the clay bar itself never touches your paint. It adds clarity and luster to the surface of your vehicle. Before you can apply the clay bar, you'll need a lubricant or detail spray. Spray the lubricant, working on small areas at a time. Wipe the clay bar in a crosshatch pattern across your car. There will be resistance at first, but you'll know it's working when it becomes easier to move. Once there is no more resistance, clean the area with a microfiber towel. The surface should be slick to the touch. Keep repeating this step until you've covered the entirety of the car. The same results can be achieved using a detail mitt.

A man waxing a car with a power waxer

6. Wax On

Then do a round of wax to protect the car's surface. Spray a section of the car and rub in the wax using a damp microfiber towel, buff out the remaining wax with the clean side of the towel. This will prevent the car's paint from fading or discoloration while keeping the glossy shine!

7. Windows & Glass

The last step is to treat your windows, headlights, and tail lights. Use a non-abrasive sealant recommended for glass, which should add UV protection.

Your car should look brand new! But that's just the outside. Now it's time to tackle the inside, which means cleaning the rugs, flooring, and upholstery.

Get That New Car Smell Once Again — Interior Detailing

The interior of a black car

1. Take Out the Trash

First things first. We know there is trash in your car. There is always trash in a car, and it's time to clean it out! Clean out the door panels, cupholders, and the floor - especially under the seats!

2. Work from Top to Bottom

After picking up the trash, it's best to work from top to bottom. Give your windows and mirror a crystal clear shine with glass cleaner and a microfiber cloth. Don't forget to roll down the windows and get the line of grime along the top. This is something most people forget, but remember, it's all about the details.

A man using a vacuum to clean the interior of his car

3. Clean the Seats

Next is the upholstery. There are three kinds of car seats, and each one needs a different method of cleaning.

  • For leather seats, use a leather cleaning compound and rub it into the seat using a towel. Make sure you are flipping the towel often, using a clean side. Once the compound sets in, use a microfiber cloth to wipe off the excess and dry the seat.
  • Vinyl is easier to take care of than leather. For vinyl seats, use some glass cleaner, spray it on and wipe it off.
  • The third kind of seat is cloth. Don't use liquid cleaners on cloth seats. The liquid seeps into the seats and never fully dries, leaving your car smelling musty. Instead, leave some baking soda on the seats for a couple of hours, then vacuum the seats. The baking soda will also help tackle any odor in your vehicle, so if you have a smelly car, don't be afraid to leave the baking soda sit for a while.
A man using a microfiber cloth to clean the interior of his car

4. Wipe the Dash

Now it's time for the front. You'll want to work on the front and door panels where all the gadgets and gizmos are located. For the dashboard, vacuum or wipe all the dust off first. Finish cleaning by applying an all-purpose cleaning product. Use a thin duster to clean the air vents. Wipe down all doors and handles.

5. Vacuum it Up

The next step is to vacuum. It's time to use the attachments on your vacuum cleaner. The floor mats will be the dirtiest, so make sure you spend time cleaning them. It's easier to remove the floor mats and vacuum them outside of the car. It also allows you to sweep underneath the floor mats. Use carpet cleaner to get out any stains and use different vacuum attachments to clean out and around all crevices.

The first time you detail a car will take longer until you get it figured out, but the payoff is worth it in the end. Maintaining your car's "new look" will make you want to stay in the car longer and up its value when you go to sell the vehicle or trade it in.


While do-it-yourself projects can be fun and fulfilling, there is always a potential for personal injury or property damage. We strongly suggest that any project beyond your abilities be left to licensed professionals such as electricians, plumbers, and carpenters. Any action you take upon the information on this website is strictly at your own risk, and we assume no responsibility or liability for the contents of this article.

test

How to Change or Rotate Your Tires

Everything you need to know so you don't get stranded on the side of the road

Learn more
test

Gas Can Safety Tips

Play it safe; follow these protocols and tips to avoid accidents and injuries

Learn more
test

How to Siphon Gas with a Pump: A Step-by-Step Guide

This useful skill can help you out in a number of emergency situations

Learn more